
Godot water / 2026-09-10 / 18 min read
Verified as of Godot 4.7.2 stable (Compatibility), checked 2026-09-08
Water Depth Maps and Bathymetry in Godot 2D
Build a shared water depth map in Godot 4 for top-down 2D swimming and boat clearance. Includes an MIT example project and CPU/GPU checks.
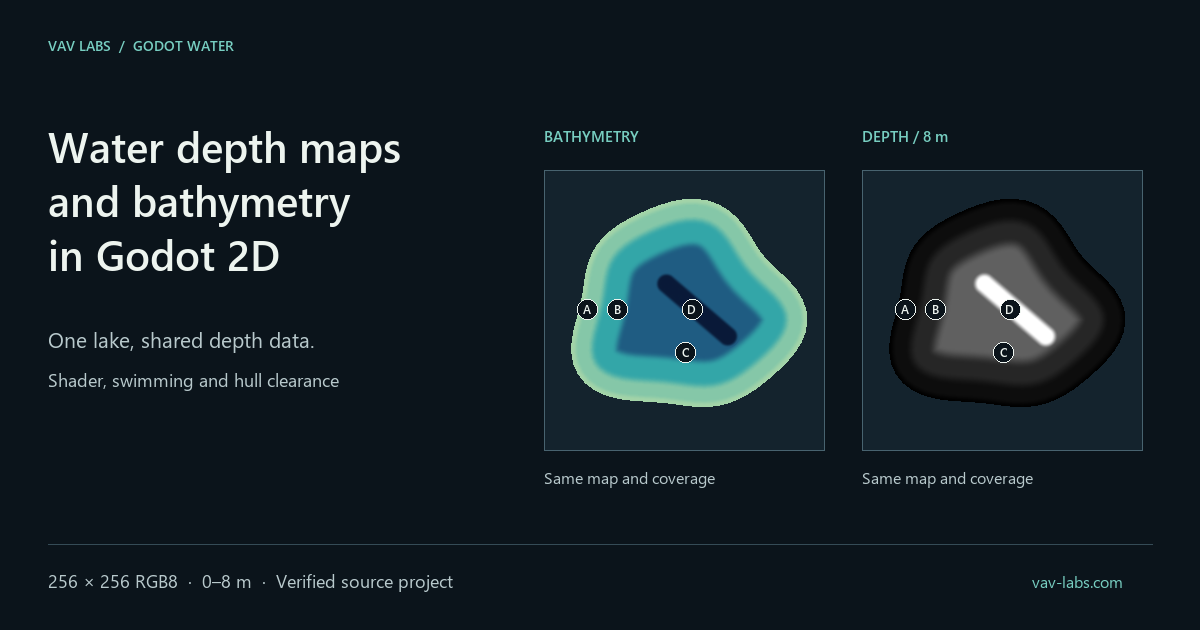
One depth field for the lake
Your top-down lake in Godot looks shallow near the shore, but the boat crosses it without slowing down. You add an Area2D for the shallows, then move the shoreline and have to update the artwork and the movement rule separately. The swimming transition can drift out of sync in the same way.
In top-down 2D water, a depth map stores the vertical distance from the water surface to the bed at each position. The shape of that bed is its bathymetry. In Godot, your shader and gameplay code can read the same map to colour the shallows, set swimming transitions and check clearance beneath a boat. Each use still needs its own rules.
We'll use one lake with a shallow shore and a deep trench. The Lake Depth Lab example lets you inspect the data, move two gameplay probes and compare CPU samples with the shader.
Download the Godot example (MIT, 53 KB ZIP). Open the setup instructions to run it alongside the article.
What water depth can decide in a game
Depth becomes useful when it affects a choice the player makes or the way you draw the underwater space. Here are some mechanics you could build around it.
| Mechanic | Decision | Use for depth data |
|---|---|---|
| Wading and swimming | Can the character stand here? | Compare local depth with the character's thresholds and current state. |
| River crossings | Is the shortcut through the river worth taking? | Give a shallow crossing a movement cost that changes with depth. |
| Boat routes | Can this vessel cross the shoal? | Compare depth with hull draft. A route may fit a small boat but stop a deeper hull. |
| Fishing and resources | Where should fish, plants or collectible objects appear? | Define depth bands and combine them with other placement conditions. |
| Diving | Can the character enter or reach this underwater area? | Combine available depth with diving ability, equipment and access rules. |
| Underwater visibility | Which parts of the floor or an object can be seen? | Use floor shape and object depth in projection, attenuation and occlusion calculations. |
Two categories may be enough. Shallow water can be crossed, while deep water stays off limits. A few regions or tile types can handle that. The amount of data should follow the decision you're trying to make.
What an interpolated map adds
A depth map can describe the slope between a shallow shelf and a deeper basin. That slope has a width, so hull clearance can change gradually along it. A swimming threshold then cuts across the same field at the relevant depth.
You can also place a trench diagonally through the lake or put a narrow crossing where it serves the player's route. Texture resolution limits the detail, but the shape doesn't have to follow the boundaries of your gameplay tiles.
When you move the slope, the visual and the grounding rule can read its new position together. That requires matching coordinates and synchronized updates. A separate, manually maintained shallow-water region can still drift out of sync.
Tiles can store numeric depths, support interpolation and supply several systems too. A texture is a practical way to author and sample the field. Calling it continuous doesn't remove its finite resolution or storage precision.
Where it earns its place
Depth can shape routes in naval and pirate games, organize resources in island survival or fishing games, and separate wading from swimming in an exploration adventure. Colony simulations can use it in crossing costs. In a tactical game, a shallow ford can make one stretch of river worth defending.
For decorative surface colour, ripples or foam, a visual shader may be enough. Rendering a shaped lake bed or hiding an underwater object behind a trench lip can justify depth data even if no gameplay rule uses it.
Consider a depth map when:
- A character's movement state or contact with the floor depends on local depth.
- Boats need routes with a measurable amount of clearance.
- Underwater placement or visibility depends on the shape of the bed.
- You edit slopes and shallows that both rendering and gameplay need to read.
These are reasons to consider a shared depth field. If a few discrete zones cover your requirements, start there.
Bathymetry in a 2D scene
Bathymetry describes underwater terrain through its depths and shape. It includes the shallows, slopes and depressions beneath a body of water. NOAA's definition of bathymetry.
Keep these three quantities separate:
| Data | What it describes |
|---|---|
| Water coverage | Whether a position is inside the water. |
| Water depth / bathymetry map | The vertical distance from the surface to the bed, for the declared water level. |
| Object depth | How far below the surface a fish or another object is. |
In this project, positions across the lake use Godot's local X/Y plane. Depth is a separate value measured vertically down from the water surface, in metres. Local +Y points down the plan view. It doesn't represent vertical depth.
The map covers 32 × 32 m, centred at the origin. At 32 Godot units per horizontal metre, its local rectangle runs from (-512, -512) across 1024 × 1024 units. A 256 × 256 texture gives us 0.125 m per texel.
| Part of the lake | Target depth | Shape |
|---|---|---|
| Authored shoreline | 0 m | Start of the gentle shore |
| Outer shelf, A | 0.4 m | Broad shallow area |
| Inner shelf, B | 1.2 m | Shallows before the main slope |
| Basin, C | 3 m | Bed around the trench |
| Trench floor, D | 8 m | Narrow depression inside the basin |
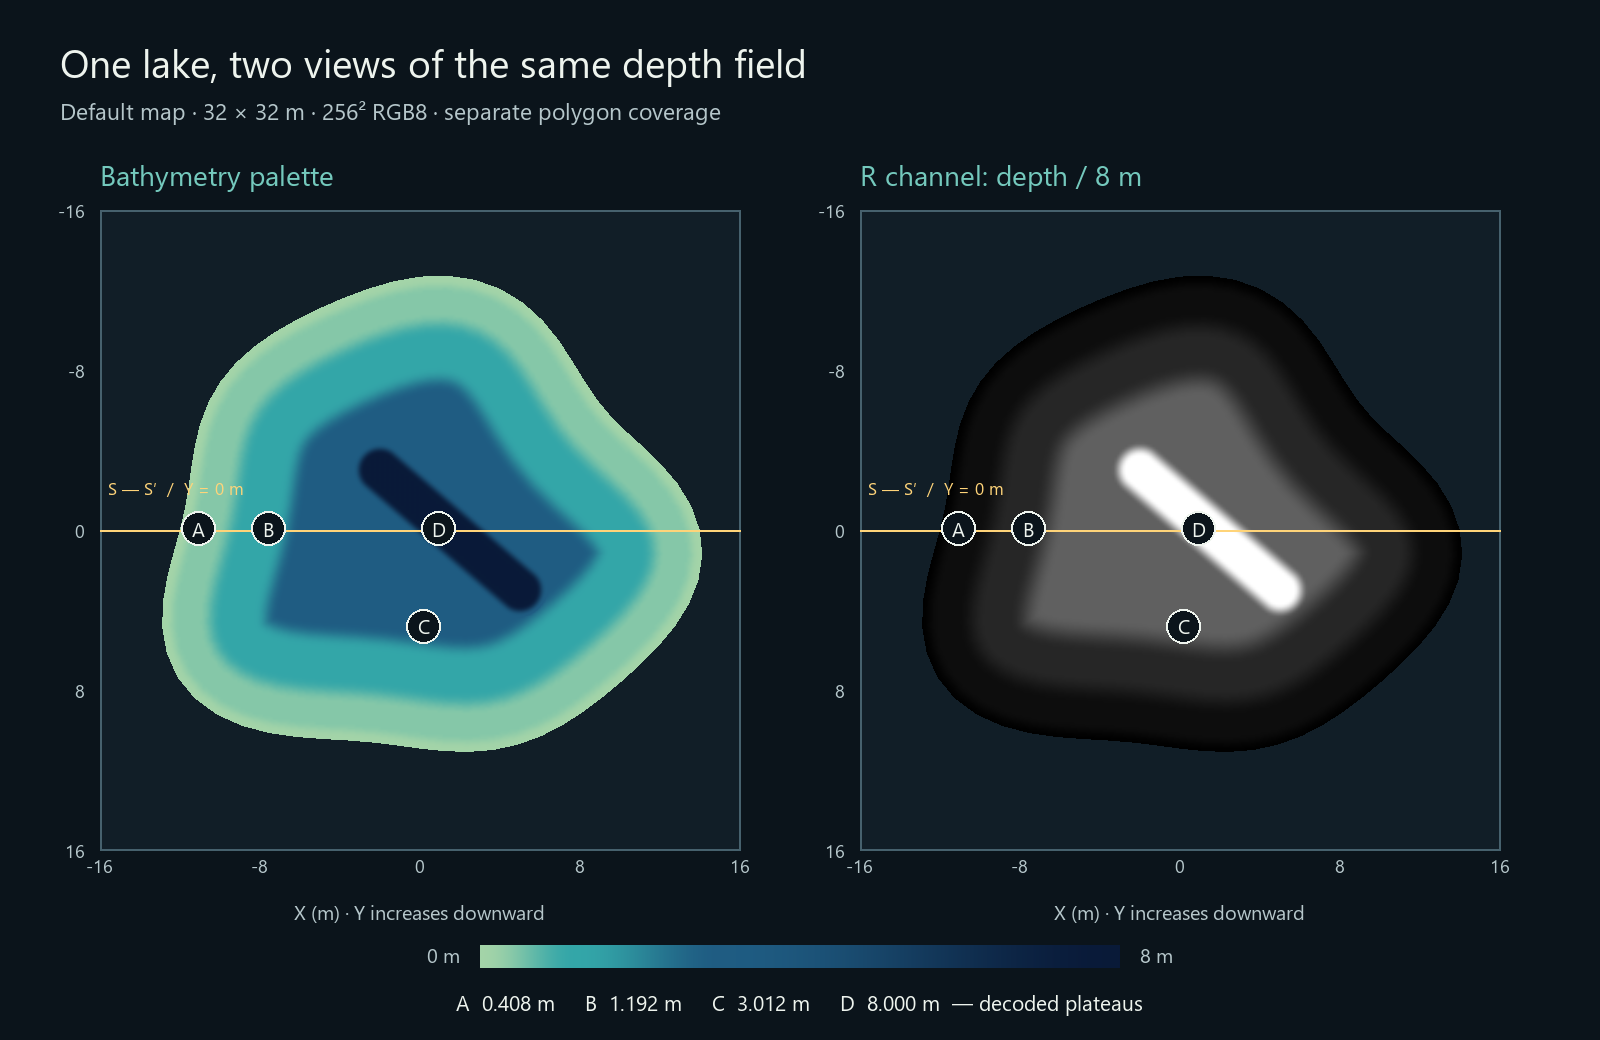
Water coverage is stored separately as a 64-vertex polygon. The rectangular texture includes land outside that polygon. A value in the texture doesn't make that position water.
Store a water depth map in an 8-bit texture
The project uses an RGB8 PNG and reads depth from its red channel. The generator writes the same byte to all three channels so the source is easy to inspect as grayscale. A normalized value of 1.0 represents the reference depth of 8 m.
There are 256 byte values, including zero. Across 0–8 m, adjacent values differ by 8 / 255, about 3.14 cm. Our design targets therefore decode as follows.
| Point | Target depth | Stored byte | Decoded depth |
|---|---|---|---|
| A | 0.4 m | 13 | 0.407843 m |
| B | 1.2 m | 38 | 1.192157 m |
| C | 3 m | 96 | 3.011765 m |
| D | 8 m | 255 | 8.000000 m |
Those differences matter near a gameplay threshold. We'll return to B when the character starts swimming. Linear filtering interpolates between stored values, but it can't recover precision or detail lost when the map was encoded.
Keep the reference depth with the data. Changing it from 8 m to 16 m without re-encoding the PNG doubles every decoded depth. The authoring tool, CPU sampler and shader need the same scale.
Import the numeric data
The supplied .png.import files select Godot's Image importer. The loader keeps that Image for CPU queries and creates an ImageTexture from it for rendering. Both consumers start from the same pixels. The loader also checks the dimensions, RGB8 format and that the image is readable before replacing the current field. See Godot's documentation for the Image importer and ImageTexture.create_from_image().
The depth sampler has no source_color hint. Its channel contains numeric data, so we preserve those values through sampling. Godot documents the distinction between sRGB colour textures and data such as height textures in its source_color guidance.
If the water level changes
This example has a fixed surface. For a changing level, you can store bed height relative to a fixed datum and calculate:
With a depth map authored for a known initial water level, the equivalent is current_depth = original_depth + water_level_change. Raising the surface by 0.5 m adds 0.5 m above the same bed wherever water is present. It doesn't change the PNG's decoding scale.
Flooding beyond the old shore also requires terrain data outside the lake and updated coverage. The companion project's fixed polygon and underwater map don't provide that extension.
Shaping the shore, slope and trench
The generator starts with the distance to the shoreline. It builds a gentle descent to the 0.4 m shelf, continues to the 1.2 m shelf, then reaches the 3 m basin. Holding the same drop over a wider horizontal distance gives you a gentler slope.
The trench is a separate, elongated shape cut diagonally into that basin. Its position doesn't follow distance from the shore. Two points equally far inland can have different depths because one lies over the trench.
You could paint these shapes, generate them from curves or bake them from a terrain description. The companion uses tools/generate_lake.py so the two PNGs and their metadata can be reproduced exactly. The second map shifts the trench by (-3, +3) m while retaining the shoreline.
Choose resolution around the smallest feature you need to preserve. A narrow channel needs enough texels across its width. More pixels improve horizontal detail, while more channel precision improves the available vertical depth values. Increasing one doesn't automatically improve the other.
Read the same depth map in GDScript and a Godot shader
The shared field owns the image, the coverage polygon and the map bounds. In scripts/lake_surface.gd, a world-position query first enters the lake's local coordinate system:
Godot's Node2D.to_local() handles that conversion. The field then calculates uv = (point - bounds.position) / bounds.size and checks the rectangle and polygon before sampling. Its query result contains inside_water, depth_m, uv and revision. Use depth_m only when inside_water is true.
Bilinear sampling on the CPU
The CPU uses four neighbouring texels to match the GPU's linear filtering. This is the sampler from scripts/depth_field.gd. The image and reference depth are members initialized by the field loader.
Subtracting half a texel aligns interpolation with the centres of the stored samples. The edge indices clamp to the image. UVs outside [0, 1), including exactly 1, are rejected before that clamp can turn them into edge samples.
The -1 return belongs to this rectangle helper. Gameplay uses the water query above it, so land inside the texture rectangle is still reported as outside water. The CPU keeps its image in memory rather than reading pixels back from the GPU each frame.
Mapping the polygon to the texture
The visible lake is a Polygon2D built from the same outline. The preview shader derives its map coordinates from local vertex positions, following Godot's CanvasItem vertex convention. Here is the relevant section of shaders/depth_preview.gdshader:
The material sets those bounds from the shared field. Its included file, shaders/depth_sampling.gdshaderinc, performs the depth read:
These are excerpts from the complete project shaders. The fragment stage uses that depth to choose the palette, display grayscale or produce raw measurements. The polygon controls where water is drawn.
The CPU sampler and shader both read the original texture level, LOD 0. The shader selects it explicitly with textureLod. If the shader sampled a smaller mipmap while the CPU kept the original image, they could disagree around the trench lip as you zoom out. Filtering a distant visual can be useful, but the gameplay depth still needs a defined sampling rule.
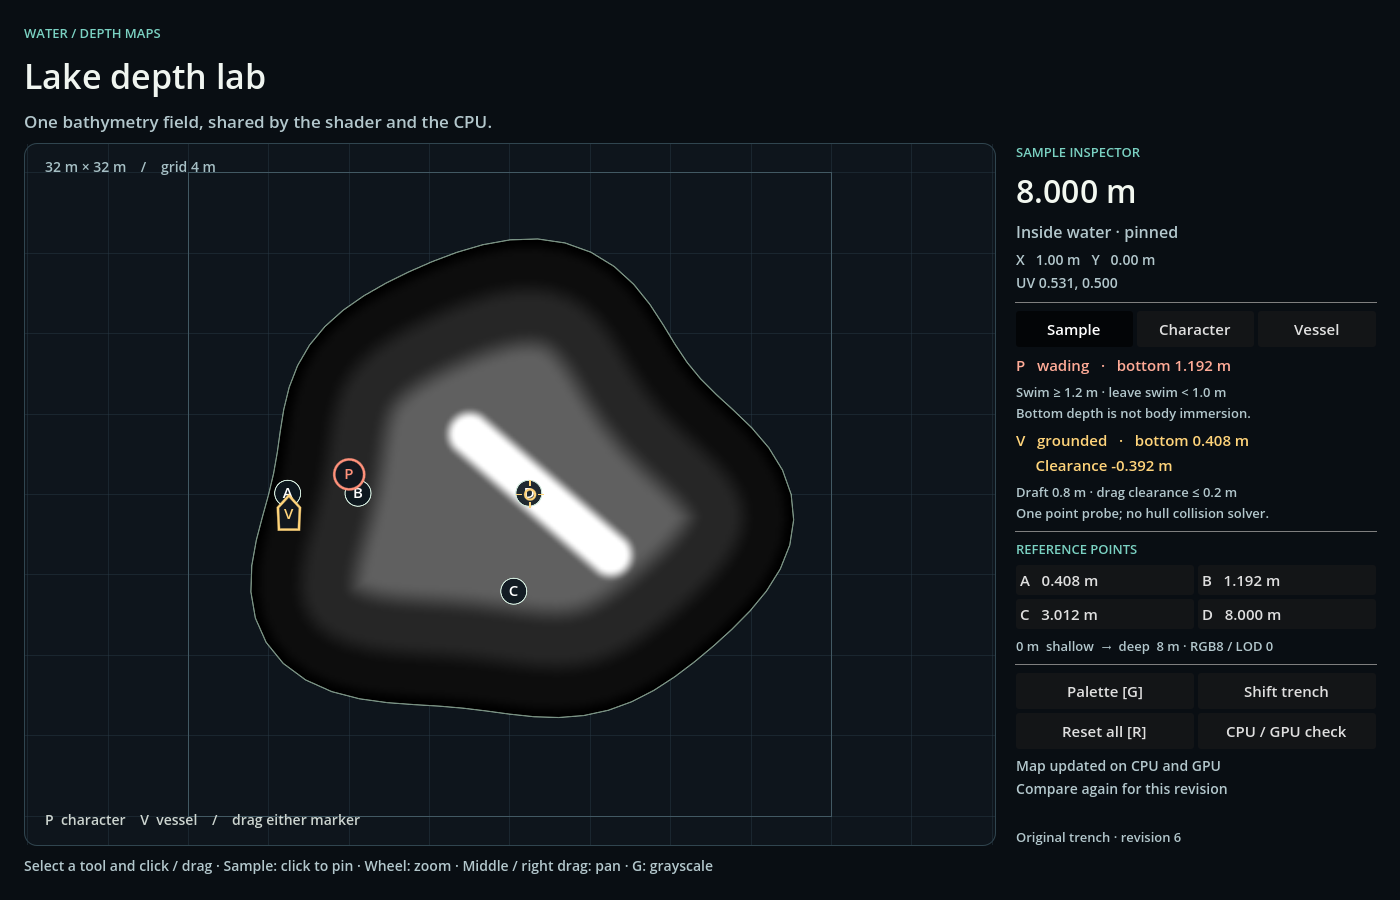
Press Shift trench to load the alternate map. The project replaces the CPU image, binds its matching GPU texture and updates both probes before another frame renders. Each query carries the field's revision. A failed load retains the previous valid field. This is a switch between two prepared maps, not a live painting tool.
Using bathymetry to draw the bed and underwater objects
A palette is the simplest visual use. You can keep the shallows light and give the trench a darker colour, making the field easy to inspect. A fuller water renderer can use depth to control how much of the bed remains visible.
For that renderer, distinguish the loss of the object's direct light from the backscatter added along the viewing path. They contribute differently to the underwater image. The distinction is described in Akkaynak and Treibitz's Sea-Thru paper. The companion's palette doesn't implement that optical model.
The trench also has geometry. A renderer can follow a viewing ray until it intersects the bed described by the depth field. Ray–height-field intersection is the basis of techniques such as relief mapping. Refraction would change the ray direction at the water surface and would need to be included in a renderer that models it.
Two fish at the same depth
The following section uses the actual profile at Y = 0. Both hypothetical fish are 5 m below the water surface. The trench reaches 8 m, while the surrounding basin has a 3 m target depth, decoded as about 3.012 m.
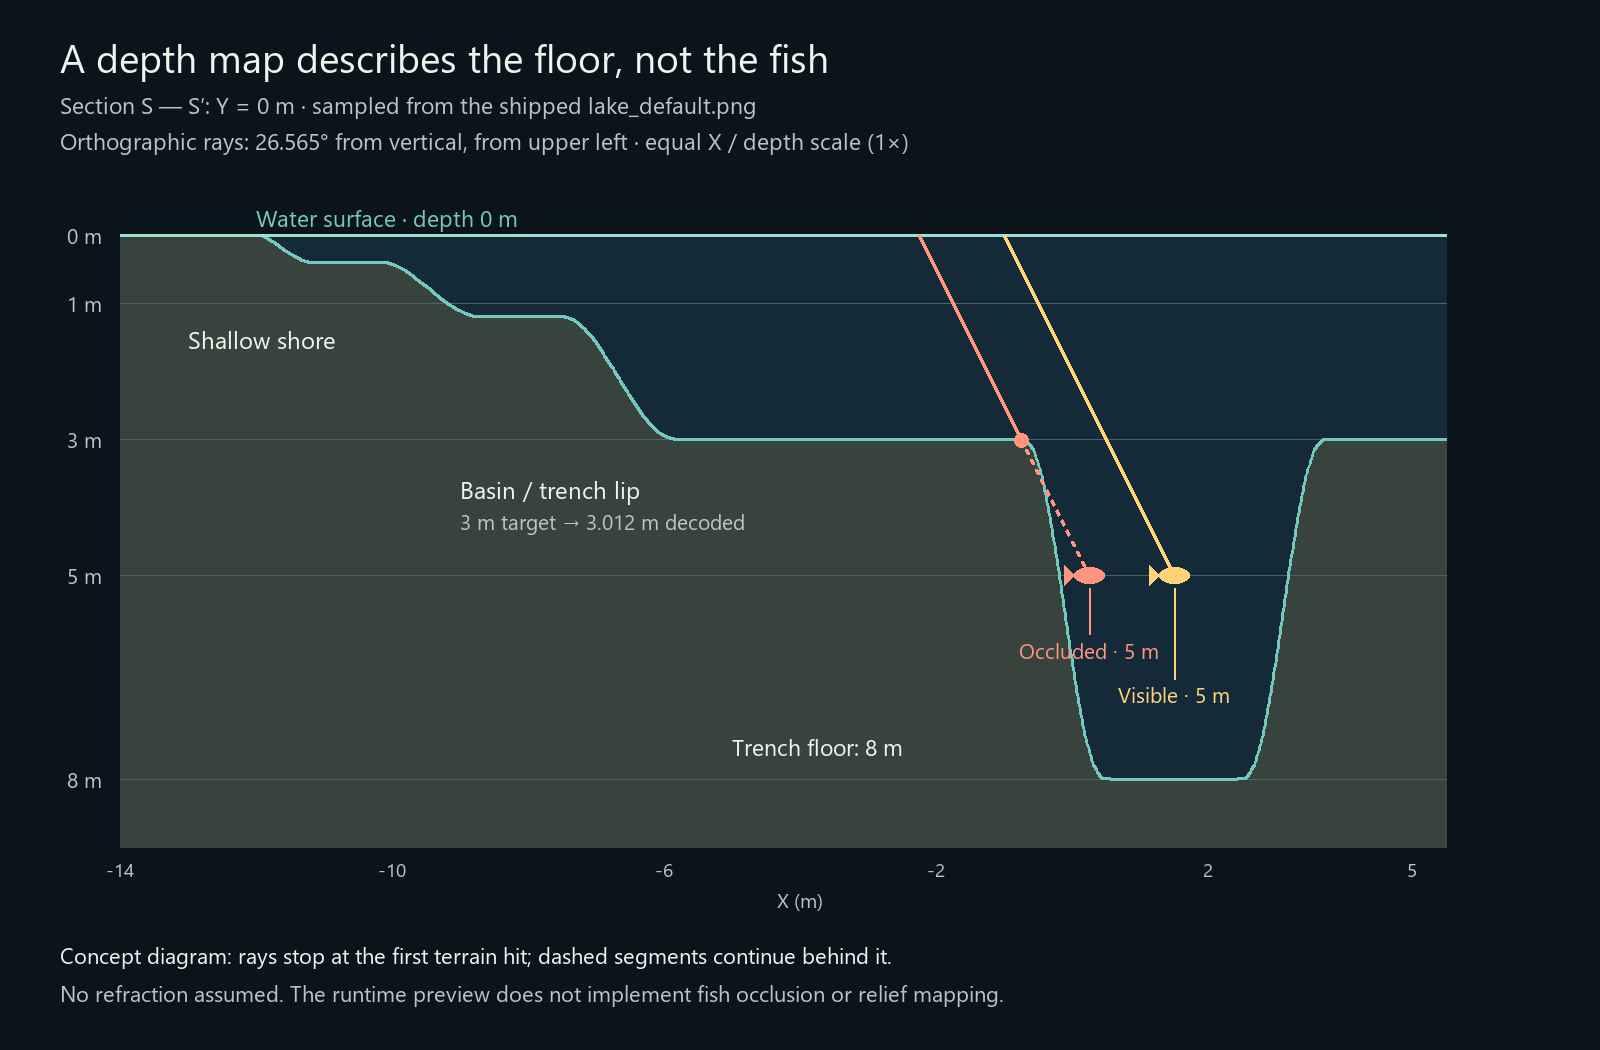
The left fish sits at X = 0.25 m. Its ray meets the basin lip before reaching it. The fish at X = 1.5 m has a clear ray through the water. Both fish positions are above the local floor. Their shared depth alone doesn't determine visibility.
With a strictly vertical view and no refraction, this lateral occlusion by the lip wouldn't occur for a fish above a single-valued bed. The projection matters. Putting a sprite beneath a water layer doesn't calculate the ray's intersection with the floor.
The fish also has its own depth. Assigning it the 8 m floor value would place it at the bottom. Its shorter path to the surface can justify different attenuation from the bed below it, depending on the optical model you choose.
The section explains a rendering calculation. The running project implements the depth preview and gameplay probes, with no fish occlusion, relief mapping or refraction shader. The figure generator checks the two ray cases against the source data and records their geometry separately from the GPU tests.
Use water depth for swimming and boat clearance
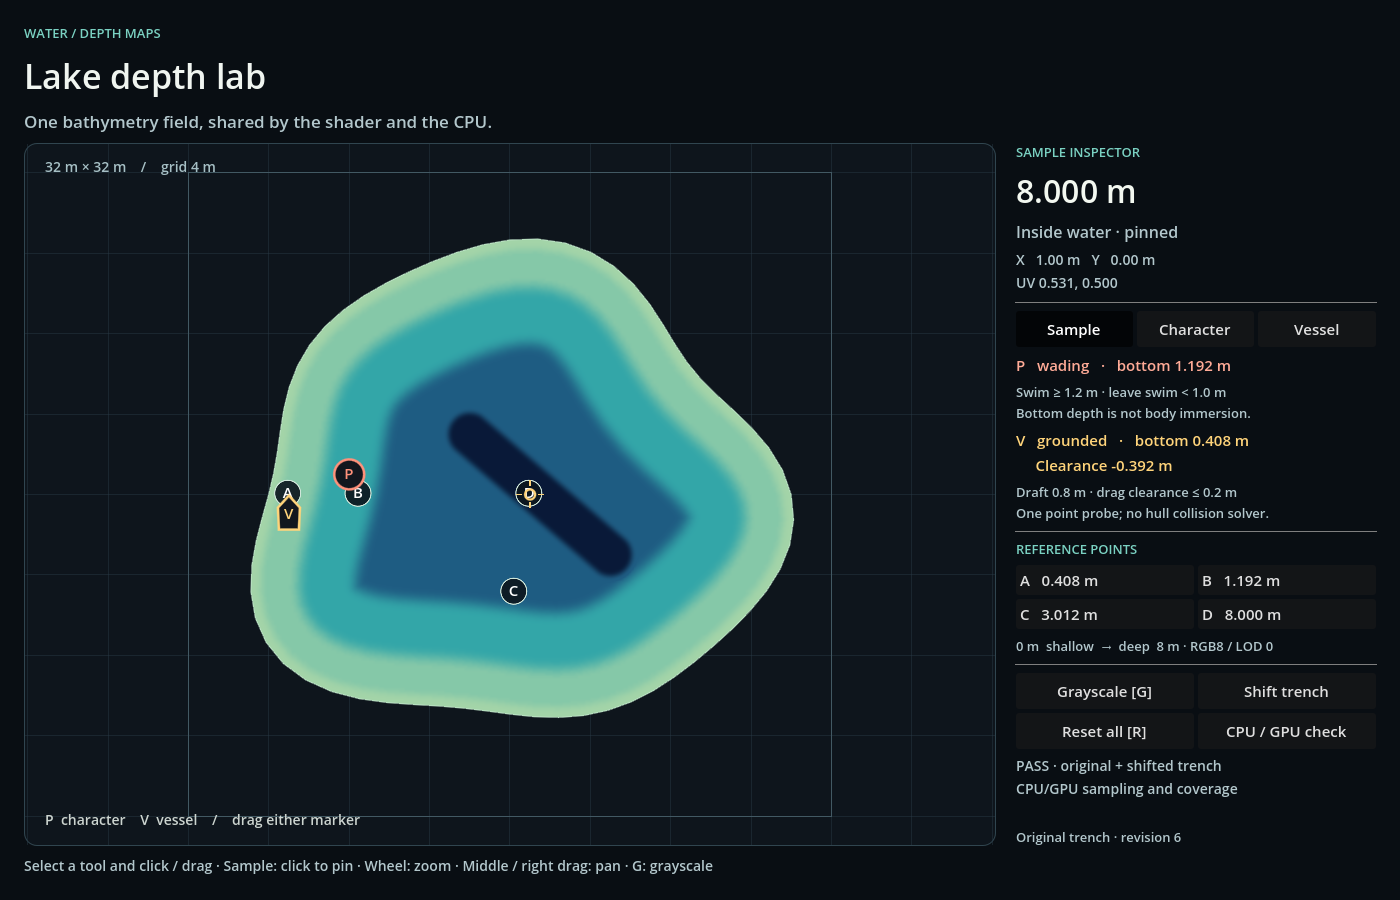
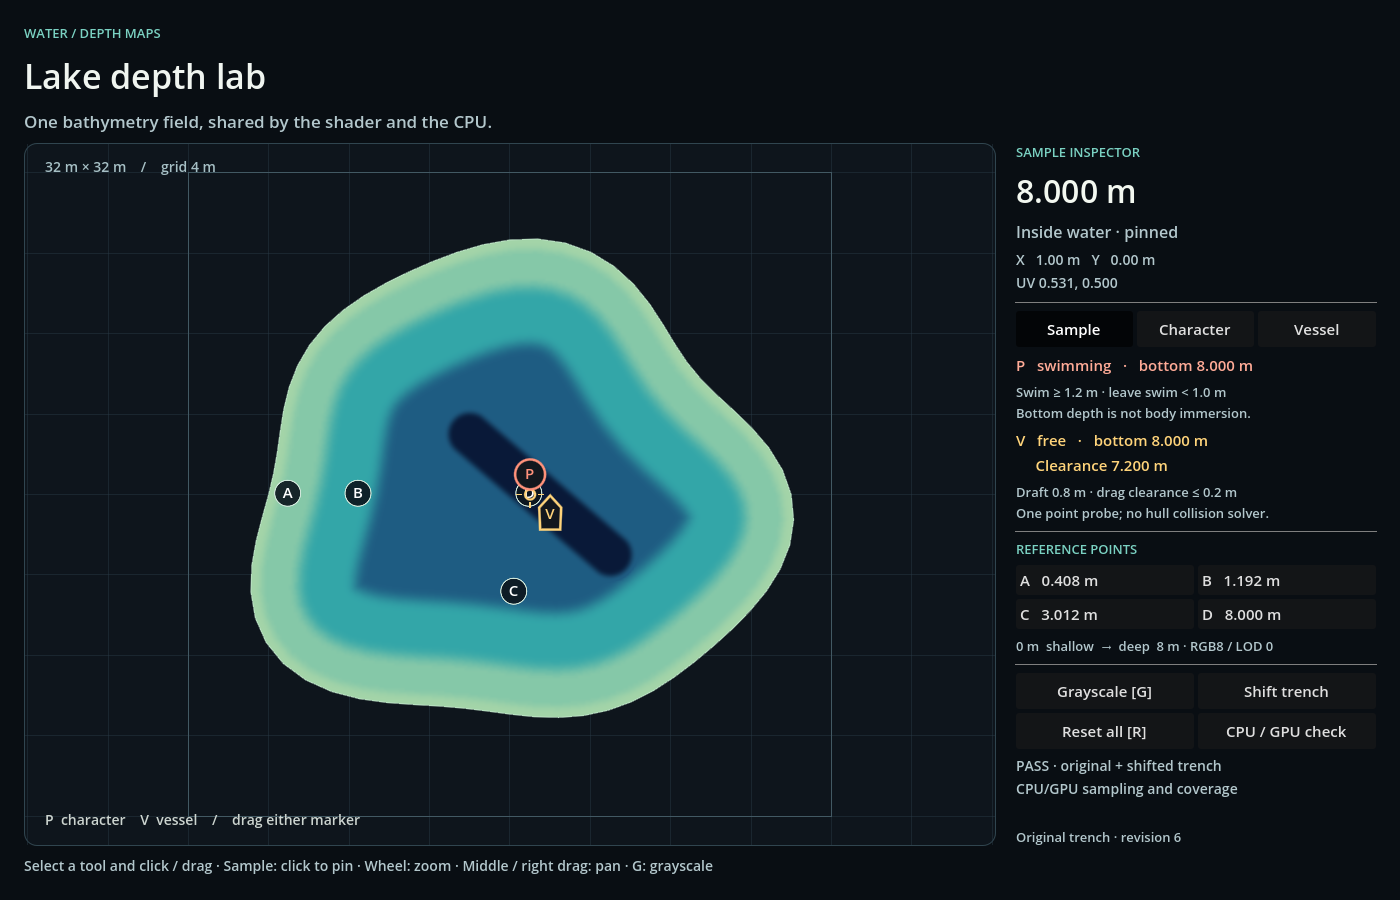
The two markers sample independently. P represents a character and V a vessel. You can place either freely. The labels show when each marker would switch state. The example doesn't move or stop a character or boat for you.
Swimming needs the previous state
For this example, a character enters swimming at sampled depth ≥ 1.2 m. Once swimming, it returns to wading only below 1.0 m. Outside the water polygon, it is dry.
The gap between the two thresholds is hysteresis. It prevents a small depth change near one boundary from repeatedly switching the character's state. The rule in scripts/water_rules.gd receives the previous state explicitly:
That file defines SWIM_ENTER_M = 1.2 and SWIM_EXIT_M = 1.0. On shelf B, the sampled depth is 1.192157 m. A wading character won't start swimming there. A character arriving from deeper water while already swimming will keep swimming. The same sample gives different results because history is part of the rule.
While a character stands on the bed, local depth can help position the body relative to the surface. Once swimming, body immersion depends on the character's position and pose. Crossing the 8 m trench doesn't automatically pull the swimmer eight metres down.
Clearance below the hull
The vessel has a fixed 0.8 m draft. Its signed clearance is:
At B, that leaves about 0.392 m. At A, the result is about −0.392 m, meaning the assumed hull extends into the bed. These values use the decoded depths, which is why they differ slightly from subtracting the design targets.
| State | Condition | Meaning in this example |
|---|---|---|
free | Clearance > 0.2 m | Enough margin under the sampled point. |
bottom_drag | 0 < clearance ≤ 0.2 m | A band a controller could use to add resistance. |
grounded | Clearance ≤ 0 | The hull reaches or crosses the bed at the sampled point. |
outside_water | Coverage is false | Clearance is invalid and returned as null. |
The bottom_drag margin is a gameplay choice. The probe reports the state, but doesn't apply drag forces or stop the vessel. A larger hull would need several sample positions because its bow can reach the shore while its centre remains in deep water. A movement controller must also account for the path travelled between samples.
What the project verifies
The source ZIP was extracted into a new folder without a Godot cache, imported and run on Godot 4.7.2-stable, using Compatibility / OpenGL 3.3 on Windows with an NVIDIA GeForce RTX 3060. The data generator then reproduced both PNGs and the metadata with identical hashes.
| Check | Recorded result |
|---|---|
| CPU data and gameplay checks | 61 passed. |
| UI integration checks | 13 passed. |
| GPU views | Both map variants at 256² and 320². |
| Samples inside water | 3,226 numeric CPU/GPU depth comparisons. |
| Samples on land | 3,744 coverage comparisons. |
| Coverage mismatches | 0 across all 6,970 sample positions. |
| Largest CPU/GPU depth difference | 0.003776478 m, about 3.78 mm. |
| CPU/GPU acceptance tolerance | 0.016 m. |
The CPU checks include known plateau bytes, an independent 2 × 2 interpolation fixture, coverage, edge handling and transformed lake queries. Gameplay checks exercise the swimming thresholds from both directions, state history, hull clearance boundaries and leaving the water. The UI checks cover probe movement, independence, map refresh, reset and pan/zoom consistency.
The GPU test draws the actual polygon with the preview shader's diagnostic mode. It packs depth into two byte channels and uses alpha for coverage. The CPU query is evaluated at the corresponding pixel-centre position. Depth isn't inferred from the presentation colours.
Rendering at 256² tests source texel centres. The 320² view also tests positions that require interpolation. The 0.016 m tolerance belongs to this CPU/GPU filtering and readback comparison. The PNG's rounding error is a separate issue.
The checks compare CPU and shader depth readings and test the probe states. They don't measure frame time.
These results apply to the recorded engine, renderer and device. They don't establish compatibility or performance on every target. The verification JSON contains the detailed results and the SHA-256 of the exact source ZIP used for the clean extraction.
Limits of the field
A depth map assigns one floor depth to each horizontal position. It can describe this lake and trench, but a cave under an overhang needs more geometry because several surfaces occupy the same X/Y position.
Higher resolution increases storage and update work. More precision needs a format and sampling path that preserve it. If you edit or regenerate the bed, update the CPU and GPU consumers together. Any baked representation needs to be refreshed too.
Flow direction, waves, buoyancy and collision response require their own data or calculations. Bathymetry can inform them without specifying the complete behaviour. The example keeps its water level fixed and its gameplay probes limited to one point each.
Open the companion project
Lake Depth Lab 1.0.0 is a standalone educational source project. It includes the lake data, generator, sampler, preview shader, movable probes and verification tools. The original code, data and documentation use the MIT licence, © 2026 Vav Labs.
Download the source ZIP and read the verification results.
Extract the ZIP, import project.godot and press F5. No addon, Python or network connection is needed to run the scene. The UI is built at runtime, so the editor initially shows the root Control.
Try this sequence:
- Drag P into the trench, then back to B. It keeps swimming at B until you take it below 1 m depth. Reset returns it to wading on the inner shelf.
- Drag V from the trench towards the shore. Watch the signed clearance and the transitions through
free,bottom_dragandgrounded. - Put a probe outside the shoreline. P becomes
dry. V becomesoutside_waterwith no valid clearance. - Leave a probe near
(2, 0)m in the original trench and press Shift trench. Its position stays fixed while the sampled bed changes underneath it.
Select Sample and click to pin the inspector. You can also select Character or Vessel and click to place that probe. The wheel zooms, middle or right drag pans, G switches grayscale, and R resets the map, probes and view.
To repeat the checks with godot on your PATH, run these commands from the extracted project directory:
The last command needs a GPU renderer. It writes the GPU report and runtime screenshots, then exits. Python is only needed for the optional data, figure and package regeneration tools described in the project's README.
The verified source ZIP is 52,893 bytes. Its SHA-256 is:
The separate checksum file and verification report identify the same archive. A rebuilt or edited ZIP needs a matching new receipt.
Frequently asked questions
Why would a top-down 2D game need water depth data?
Water depth data can guide swimming, boat clearance, crossings, diving and resource placement. It also describes the bed for underwater rendering. Choose the map's detail around the rules and shapes your game needs.
Do I need a depth map for decorative water?
Usually not for surface colour, ripples and foam. A visual shader may cover those needs. If the decoration includes a projected trench or objects hidden behind the bed, the rendering can benefit from bathymetry even without gameplay.
Can I use a noise texture as a depth map?
Yes, if its values have a defined depth scale and both rendering and gameplay read the same field. You'll need control over local shapes for a particular shore, trench or crossing. Keep animated surface noise separate when it should leave the bed unchanged.
Are 8 bits enough for a water depth map?
An 8-bit depth channel with a 0–8 m range has a 3.14 cm step between encoded depths. That is enough to demonstrate the selected rules, but the B plateau shows why quantization matters at a threshold. Choose more precision when the smallest depth difference you need can't survive encoding.
Does the depth map replace collision shapes?
It can supply swimming and grounding decisions. It doesn't create movement response or obstacle avoidance by itself. The controller decides how to use the sample, and an extended hull needs more coverage than a single point.
How do I read the same water depth map in GDScript and a shader?
Use the same pixels, map bounds and depth scale on both sides. In this example, GDScript converts a position into lake-local coordinates and interpolates four neighbouring texels. The shader uses matching coordinates and linear filtering at LOD 0. Both read the red channel and multiply it by the reference depth. Check water coverage before using the result for gameplay.
How do I use water depth for swimming and boat grounding in Godot?
Check that the position is inside the water, then apply your actor's rules to the sampled depth. This example enters swimming at 1.2 m and returns to wading below 1.0 m. For a boat, subtract its draft from water depth to find clearance below the hull. The probes report these states. Your movement controller must decide how to move or stop the actor.